Starting a JavaScript project can be so much work nowadays. Back in the day, you could open Notepad, load jQuery, and have something ready within the hour. Now frameworks with complicated build steps (transpile, package modules) and lots of files are expected.
I was listening (late) to StackOverflow podcast #120, where they discussed Glitch.com, a platform that sets a low bar for beginning a JS project. It also has a friendly, helpful community. All in all, it reminded me a lot of Scratch, where i learned to program.
Anyways, for an app i'm working on (React Native), i needed a simple web page to run a certain tool. This would need a JSON file from the app.
I could do it in React, compiled with Babel and Webpack, but that would seriously be overkill.
I decided to go old-school-ish and use a simple HTML file with jQuery. I can load the JSON (actually a JS module that exports an object) directly because Chrome now supports ES6 modules. The tool is internal-only, so lack of support elsewhere doesn't matter.
At first it felt kind of weird, using jQuery with ES6. Even using ES6 with no transpiling was a bit odd at first. I tried using an arrow function in a jQuery callback before remembering that i actually need a regular function that can receive this. But after, it was great! I could write simple, modern code, that i ran using only a static file server.
It works, and i'd gladly do it again when needed.
Monday, January 22, 2018
Wednesday, October 25, 2017
Ubuntu 17.10 review -- Installing
I installed Ubuntu 17.10 this week, a couple days after it came out. I'll be posting my first impressions in a few posts.
I bought a new SSD to replace my HDD, because SSDs are so much faster. That meant that i did a clean install to a blank hard drive, not an upgrade from 17.04.
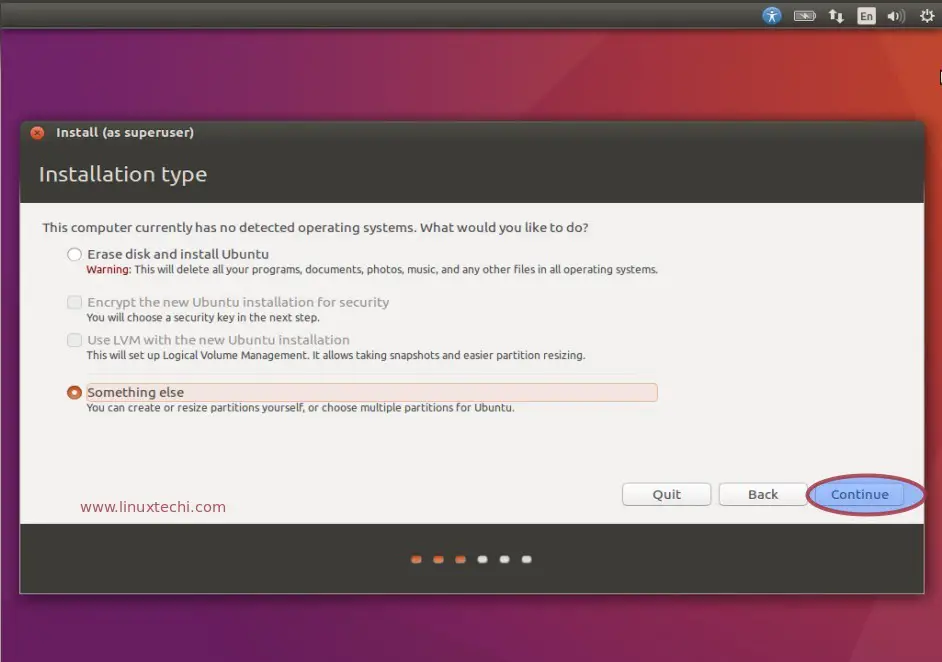
My original plan was to create a few partitions -- /boot, /, /var, /home. I reached the installation type screen:
 Screenshot not mine. Taken from Google and linked to the source.
I chose the manual partitioning to set it up as i like. I did not create a swap partition, because supposedly this version is supposed to use a swap file.
When i went to click install now, i got this message:
Take 2. When i reach the partitioning step, i follow the advice in the bug tracker to create a FAT32 partition, then modify to EFI after clicking go back. Unfortunately i can't click go back again.
Take 3. Create the FAT32 partition and set it to have a mount point of /boot/efi.
Take 4. Create the partition directly as EFI. Again, no dice.
Getting really fed up with the installation process here.
I head to restart the computer, to make sure i'm starting with a clean slate and nothing broken from all those times killing the installer. After clicking reboot, i get hit with a black screen with text that ends in:
I read here that it can have to do with leaving the "download updates" option checked in a previous step, so this time i tried unchecking it. When i reach the manual partitioning step, i don't even remember now what i tried, but it didn't work.
Game over. I give up and go for the automatic partitioning. I opt for full-disk encryption and LVM. It says it's creating partitions for EFI, boot, root, and swap. Swap? I thought it used a swap file, not partition. Whatever, doesn't make a difference.
Finally finish installing. REISUB to reboot the live USB again, and finally i'm in!
I am very impressed with the speed of the new SSD. On my HDD, it took around a minute from booting till i had a usable system and could open apps. On the SSD, around 8 seconds.
I don't know why it was so hard to do manual partitioning this time; i've done it in the past without such a problem.
Final verdict: Grrrrr.
I bought a new SSD to replace my HDD, because SSDs are so much faster. That meant that i did a clean install to a blank hard drive, not an upgrade from 17.04.
My original plan was to create a few partitions -- /boot, /, /var, /home. I reached the installation type screen:
I chose the manual partitioning to set it up as i like. I did not create a swap partition, because supposedly this version is supposed to use a swap file.
When i went to click install now, i got this message:
Force UEFI Installation? This machine's firmware has started this installer in UEFI mode but it looks like there maybe existing operating systems already installed using BIOS compatibility mode, If you continue to install Debian in UEFI mode, it might be difficult to reboot into any BIOS-mode operating system.I don't know why it's detecting other OSs when the disk is literally empty. Also, i now can't click on anything -- not go back, continue, or even the X. Known bug, apparently. I'm stuck opening the system monitor and killing the installer. :(
Take 2. When i reach the partitioning step, i follow the advice in the bug tracker to create a FAT32 partition, then modify to EFI after clicking go back. Unfortunately i can't click go back again.
Take 3. Create the FAT32 partition and set it to have a mount point of /boot/efi.
Take 4. Create the partition directly as EFI. Again, no dice.
Getting really fed up with the installation process here.
I head to restart the computer, to make sure i'm starting with a clean slate and nothing broken from all those times killing the installer. After clicking reboot, i get hit with a black screen with text that ends in:
A start job is running for Hold until boot process finishes up (4min 3sec / no limit)I wait out the 4 minutes, then give up and have to REISUB. Frustration level: shaking fist at computer. Literally.
I read here that it can have to do with leaving the "download updates" option checked in a previous step, so this time i tried unchecking it. When i reach the manual partitioning step, i don't even remember now what i tried, but it didn't work.
Game over. I give up and go for the automatic partitioning. I opt for full-disk encryption and LVM. It says it's creating partitions for EFI, boot, root, and swap. Swap? I thought it used a swap file, not partition. Whatever, doesn't make a difference.
Finally finish installing. REISUB to reboot the live USB again, and finally i'm in!
I am very impressed with the speed of the new SSD. On my HDD, it took around a minute from booting till i had a usable system and could open apps. On the SSD, around 8 seconds.
I don't know why it was so hard to do manual partitioning this time; i've done it in the past without such a problem.
Final verdict: Grrrrr.
Sunday, September 10, 2017
Install Internet Rimon Root Certificate on Linux
I had a bit of trouble with this; i decided to post the solution for anyone else.
Internet Rimon is an Israeli ISP for "kosher" (filtered) internet. Because they check each page, they want access to your encrypted pages also. To enable this, you need to install a root certificate from them. (If you don't, you get an invalid certificate error, and pages with HSTS enabled simply won't load.) I know, filtered internet and FLOSS don't usually go together, but sometimes you're not in control...
Apparently it's not to difficult to get around their filtering (use a VPN), but i decided it wasn't worth my while and i'll just play by the rules.
On a "normal" (read: Windows) setup, you go to their certificate download page and choose your browser. There are 4 options: IE, Chrome, Firefox, Safari (Mac only).
I don't know this is specifically set up for Windows yet. I'm using Chrome, so i pick Chrome.
Chrome (and IE) take you to a download for a myca.reg file, which is for modifying the Windows registry, arguably the simplest solution for a non-technical user (3 clicks and you're done). Needless to say, this doesn't work on Linux.
So now i try the Firefox option. The image instructions seem even simpler (on Windows) than for Chrome. Downloading the file gets you a myca.crt file, the actual certificate, which is what you need. It is available at the time of this writing here. Opening the file on my Ubuntu machine brought up a viewer with an option to import, so i clicked, but it didn't work (sites still blocked). It could be i needed a restart; i didn't check (update: didn't work after restart).
To import it into Chrome, open settings, scroll to Privacy and Security (or search for cert), and click on manage certificates. You will see 4 tabs: Your Certificates, Servers, Authorities, and Others. There is an import button in the middle of the screen. Don't click it. I tried this at first and came up with a missing private key error.
Go to the Authorities tab and import from there. You'll need to check at least the first box (Trust this certificate for identifying websites); i didn't bother with the rest. The CA name is Netspark. You are now good to go.
For Firefox, open preferences, go to the advanced tab, then certificates. Choose the authorities tab and import. Same instructions as for Chrome.
Note that this does not install it as a root certificate on the computer, so other programs (e.g. command line) trying to access secure sites won't work.
For completeness, the Safari option downloads a .dmg file, which probably (i haven't tested) applies system-wide and will work on Mac no matter what browser you're using.
Saturday, February 25, 2017
You are about to view sensitive medical information, please take appropriate privacy measures
My medical clinic has an app. You can make appointments, view lab results, medical history, etc.
I logged in to make an appointment. As it was connecting, it tells me "You are about to view sensitive medical information, please take appropriate privacy measures." OK, sounds reasonable.
Now let's take a step back. How did i log in? Was it with a username and password? A one-time verification code texted to me? NO. It was with my government-issued ID number and birth year!
I am indignant! That isn't even private information! The number of places my ID number and birthday appear -- publicly and privately -- is shocking.
You don't even implement a secure login and have the chutzpah to tell me to watch my privacy?!
I am going to write to them and complain as soon as i figure out who to send it to.
UPDATE: It appears that this easy login only works for making appointments. Viewing any other information requires your ID, randomly-assigned username, and password, which i suppose counts as secure enough.
Wednesday, December 14, 2016
On spaghetti data structures and how React changed the way i think about them
I got started with ReactJS a few months ago, and I'm Lovin' It. From the get-go, you have to think in terms of components and one-way data flow. It makes it a little less convenient for "just hacking around" and making something, but that's OK; i'm using it for a big project.
In React, data flow is single-direction, from parent components to children. And if you're using Redux, there's a single state object that is the source of all data. In a diagram, it looks like this:

My previous big project (logletlab.com) does not use React. You have various components storing their local state in various ways, mainly <input> value, selected radio button, and jQuery data. The data flow looks kind of like this:

It's awful!
You have certain options that are only available when other options are selected. There's one spot where there are two places to do the exact same thing, so the elements have to mirror each other.
When i began the project, it wasn't so complex. I thought a simple HTML <form> with a bit of JS magic would be enough. (I also didn't know better.) But as the project grew, the requirements became more complex, and i just kept patching the code.
A few months ago i had to build a system to save and load the state. (This was still before learning React.) At that point i was able to basically just serialize the form to JSON and then load those values. Last week there was an urgent bug that some options weren't being saved (hadn't been needed till now). The problem is, some of these options are lists of text inputs. Others are radio buttons. Others are lists of checkboxes. Still others are plain text inputs or checkboxes. I patched the system (again) to save the rest of the options, but it's not clean at all.
I just talked about saving and rehydrating the state, but it's even more of a pain to actually use those options. The webpage is just a frontend for sending data to the backend, but it still has to pick which <input>s to send.
It would be much nicer everywhere if it could just have a single object that's the source of truth for the webpage. If i have the time, i'll do exactly that. I probably won't actually use React for this, but i will use the lessons it taught me.
Sunday, January 24, 2016
Thoughts on Google Code-In 2015
For the uninitiated, Google Code-In is a yearly competition held by Google for highschool students, where the kids work with several open-source organizations. The organizations give tasks for the students to do, and also mentor them. Top performers (grand prize winners) earn a free trip to Google Headquarters in California. Wikimedia is the company behind Wikipedia, and MediaWiki is the software they use/create.
Another year of Google Code-In comes to a close. This is my fourth and final year participating in the competition, as i am now a highschool senior. This year i decided to work nearly exclusively with Wikimedia during the Google Code-In. I did a couple tasks with them last year too, and in fact, i still get a kick out of seeing the legend box on Wikipedia’s recent changes (last year’s task). I chose Wikimedia because i often use their services, and appreciated the chance to give back. And, of course, there’s some appeal to writing code that gets used on the 7th most visited website in the world…
 |
| Well, maybe a computer showing Wikipedia could also hold up the whiteboard |
Another year of Google Code-In comes to a close. This is my fourth and final year participating in the competition, as i am now a highschool senior. This year i decided to work nearly exclusively with Wikimedia during the Google Code-In. I did a couple tasks with them last year too, and in fact, i still get a kick out of seeing the legend box on Wikipedia’s recent changes (last year’s task). I chose Wikimedia because i often use their services, and appreciated the chance to give back. And, of course, there’s some appeal to writing code that gets used on the 7th most visited website in the world…
One of the draws of Google Code-In for me is the chance to work with technology i normally wouldn’t. It’s a very different experience working within a large, established codebase and community than writing a library or program from scratch. There’s a learning curve, including reading and following long (and very specific) style guides. It seemed a bit ridiculous when i got an automatic failure for having a comment indented to where it made sense to a human reader, but didn’t strictly follow the guide. Style issues notwithstanding, I appreciated the opportunity to work with programs such as Kiwix, Twinkle, various MediaWiki extensions, and of course, the core itself.
During the course of the Code-In, i received some reminders of the fact that open source projects often have many differing opinions among its contributors. There was one task i looked at, but decided against taking it because of the discussion on Phabricator (MediaWiki’s bug tracker). It went something like this:
A: I think we should do this. B: I think we shouldn’t. A: I’m putting it up for GCI.
Since there was clearly some opposition to making the change, i opted not to get involved here, especially as i had no real opinion on it.
I did one task to add support for the lc: and uc: magic words to mw.jqueryMsg, a utility for parsing messages on the client side. My mentor gave me a “+2 Nothing I could complain about :)” and merged the code. A day later, i see a comment: “What about Turkish?” I completely didn’t think about other languages, and i was actually glad to see someone point that out. Luckily my mentor, Bartosz Dziewoński (whose help i appreciated but whose name i cannot pronounce), saved me by pointing out that the PHP implementation doesn’t support Turkish either, so it’s not a showstopper that my JS code doesn’t.
I didn’t feel a need to venture into IRC very often, but i did occasionally stop in to ask for some help, and was pleased to find people willing to assist. I once needed help setting a stylesheet to apply only when showing the printable version of the page. I asked on IRC, and got an answer within a few minutes. When i was having some trouble with it (i got a link to a slightly outdated documentation page), a different person (Bartosz Dziewoński again!) was willing to give me some walk-through help which solved my problem. If and when i have some free time, i might just go and update that documentation page. (It’s here if anyone else wants feels like fixing it first.)
To close, i’d like to thank all the mentors who volunteered their time and effort to help out us highschoolers. Granted, they’re getting a lot of free labor, but… I decided that even though i realize i’m giving a lot of volunteer work, it’s a) for a good cause and b) might let me get in my 10,000 hours even before i turn 18. I can’t promise i’ll come back to work on more bugs without even getting a T-shirt, but please do feel free to add me as a reviewer to changes to code i’ve worked on.
Happy coding!


This work by Scimonster is licensed under a Creative Commons Attribution 4.0 International License.
Monday, October 21, 2013

Subscribe to:
Posts (Atom)